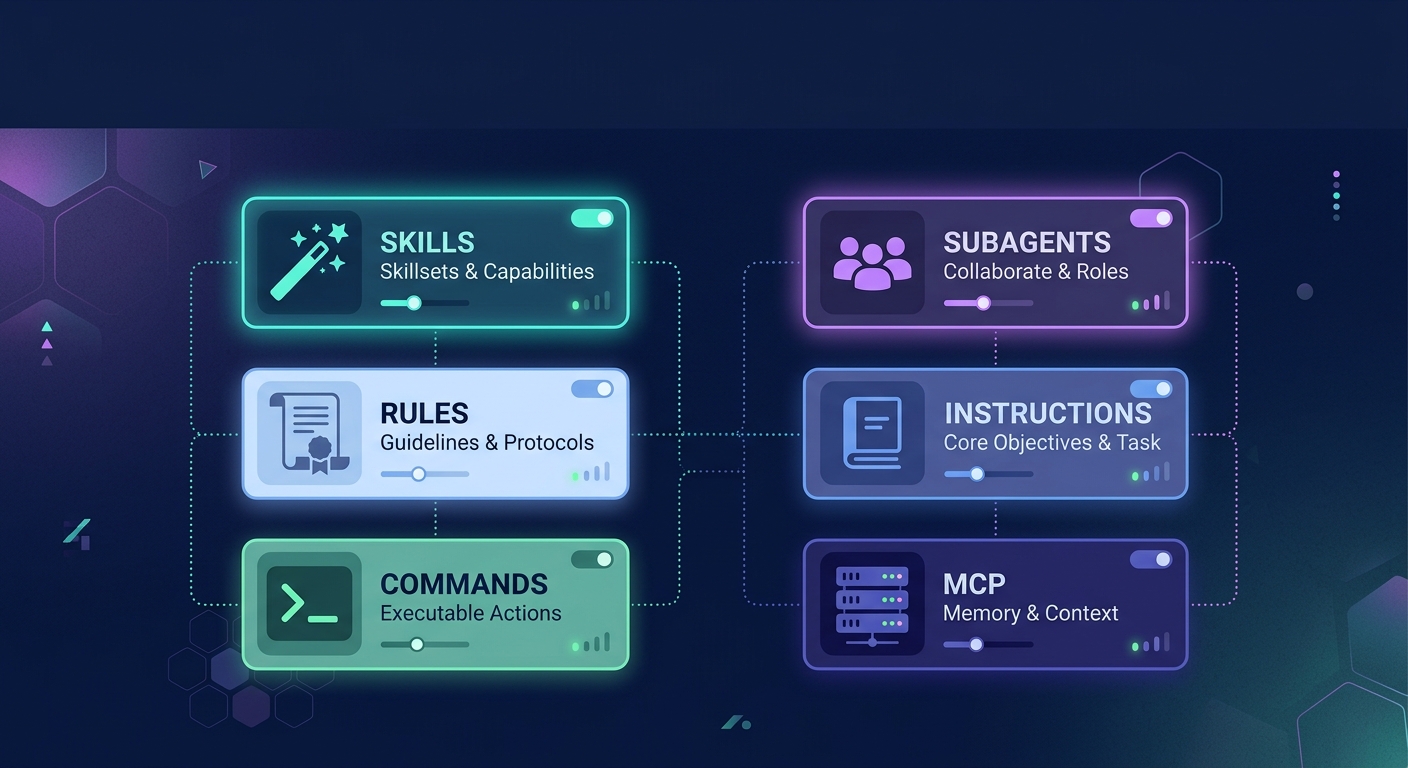
The agent does not come pre-configured for your workflow. You shape it. Tarsk provides six settings pages where you define what the agent knows, what tools it can call, and how it responds to specific commands.
This guide walks through each settings page, what it controls, and how to use it.
What you will learn
By the end of this guide, you will know how to:
- install and create skills that teach the agent reusable behaviors
- write rules that enforce coding standards across every conversation
- build slash commands for one-tap workflows
- add subagents with restricted tool access for focused tasks
- write system instructions that shape the agent’s tone and priorities
- connect MCP servers for external tool integrations
Before you start
Most settings pages require a thread to be selected. Skills, Rules, Slash Commands, Subagents, and Instructions all write files into the current thread’s directory. MCP Servers require a project to be selected instead.
If you open a settings page without the right context, you will see a message asking you to select a thread or project first.
Open the agent settings
Go to Settings using the sidebar. The settings panel lists all available pages:
- Providers and Models (for API configuration)
- Skills, Rules, Slash Commands, Subagents, Instructions, System Prompt, and MCP Servers (for agent behavior)
- General, History, and Account (for app-level settings)
The agent behavior pages are what we cover here.
Skills
Skills are reusable instruction packages. A skill is a folder containing a SKILL.md file with frontmatter and instructions. When the agent activates a skill, it reads those instructions and follows them.
Browse installed skills
The Skills page splits into two sections: Installed and Available.
The Installed section lists every skill folder found in the current project and thread directories. Click a skill name to open its SKILL.md in the file Explorer. Hover to reveal a delete button.
Install from the catalog
The Available section shows skills from the default catalog or a custom source you added. Use the search bar to filter by name or description.
Click a skill card to open a preview dialog. The dialog shows the skill’s file list on the left and a rendered markdown preview on the right. Click Install to copy the skill into your thread.
After installation, the skill appears in the Installed section with a green checkmark in the Available section.
Create your own skill
Click “Add Skill” in the page header. You need two things:
- a name (Tarsk auto-slugifies it to lowercase with hyphens)
- a description (the agent uses this to decide when to activate the skill)
Tarsk creates a SKILL.md file inside .agents/skills/<name>/. Open it in the Explorer to add your instructions.
Add a custom skill source
If your team maintains a shared skill library on GitHub, you can add it as a source. Click the plus button beside the source dropdown, enter a title and a GitHub tree URL pointing to a folder of skill directories, and verify. The source appears in the dropdown and the Available section loads from it.
Rules
Rules define coding standards and project-wide guidelines. A rule is a markdown file with a description and an “Always Apply” toggle.
How rules work
When “Always Apply” is on, the full rule content is injected into the agent’s context for every conversation. The agent sees and follows it automatically.
When “Always Apply” is off, only the rule’s description is injected. The agent decides whether to read the full rule based on the task at hand. This saves context space for rules that only apply in specific situations.
Create a rule
Click “Add Rule” and fill in:
- a name (auto-slugified)
- a description of what the rule covers
- the “Always Apply” toggle
Tarsk creates a markdown file in .agents/rules/<name>.md. Open it in the Explorer to write the actual rule content.
Install rules from the catalog
The Available section lists popular rules you can install with one click. Search by name or description. Installed rules show a green checkmark.
Slash Commands
Slash commands give you quick actions accessible by typing / in the chat input. A command is a markdown file with a name, description, and optional configuration.
Create a command
Click “Add Command” and fill in:
- a name (displayed as
/namein the chat autocomplete) - a description (shown alongside the command name)
- an argument hint (optional, displayed after the command name, like
<focus-area>) - a mode: Default (standard chat) or Plan (activates plan mode when invoked)
Tarsk saves the command to your commands directory. Open it in the Explorer to write the prompt template that executes when someone runs the command.
Use a command
Type / in the chat input. Tarsk shows a list of available commands with their descriptions. Select one and it runs. If the command has an argument hint, type the argument after the command name.
Install from the catalog
The Available section lists popular commands. Click one to install it. Installed commands show a green checkmark.
Subagents
Subagents are specialized agents with restricted tool access. They handle focused tasks without the full set of tools available to the main agent.
Create a subagent
Click “Add Subagent” and fill in:
- a name (auto-slugified)
- a description of what the subagent does and when to use it
- tools (optional, a space-separated list of tool names the subagent can access, like
read grep glob)
Tarsk creates an AGENT.md file in .agents/agents/<name>/. The tools field restricts what the subagent can do. If you leave it empty, the subagent gets the default tool set.
Install from the catalog
The Available section lists popular subagents. Click one to install it. Some subagents come from GitHub repos and include multiple files.
When to use subagents
Subagents work well for tasks that need isolation or limited capabilities:
- a code reviewer that only reads files (no write or bash access)
- a search agent that uses grep and find but cannot modify anything
- a documentation writer that writes to specific paths only
Instructions
The Instructions page gives you a single text editor for the thread’s AGENTS.md file. This file contains system-level instructions that shape how the agent approaches every conversation in that thread.
Write instructions
Open the Instructions page and type directly into the textarea. Click Save.
Instructions differ from rules in scope. Rules target specific coding standards. Instructions set the agent’s overall behavior: tone, priorities, project context, and workflow preferences.
Example instructions:
You are working on a TypeScript monorepo using Bun.
Always run type checks before suggesting code changes.
Prefer functional patterns over class-based code.
When fixing a bug, write a test that reproduces it first.
MCP Servers
MCP (Model Context Protocol) servers extend the agent with external tools. An MCP server runs alongside Tarsk and exposes tools the agent can call during conversations.
Add a local server
Click “Add Server” and fill in:
- a server name
- select the “Local (stdio)” tab
- a command (for example,
npx) - arguments, one per line (for example,
-y,@modelcontextprotocol/server-filesystem,/path/to/dir) - optional environment variables as key-value pairs
Add a remote server
Select the “Remote (HTTP/SSE)” tab instead:
- a URL
- a transport type (SSE or Streamable HTTP)
- optional HTTP headers for authentication
- optional environment variables
View and edit the config
Click “Config” in the page header to open .agents/mcp.json in the Explorer. You can also click an installed server name to open the edit dialog.
Install from the catalog
The Available section lists popular MCP servers. Click one to install it. Some servers require you to provide your own URL or credentials after installation.
MCP Servers are project-scoped, not thread-scoped. They apply to all threads within the project.
Account
The Account page shows your current plan and prompt balance. You can purchase a prompt top-up or upgrade to the Unlimited Pro plan from here.
Summary
Six settings pages control how the agent behaves in Tarsk:
- Skills teach the agent reusable workflows
- Rules enforce coding standards
- Slash Commands provide one-tap actions
- Subagents add focused, restricted agents
- Instructions set overall behavior
- MCP Servers connect external tools
Start with Instructions to set your baseline. Add Rules for your coding standards. Build Skills and Commands for workflows you repeat. Add Subagents when you need isolation. Connect MCP Servers when you need external capabilities.
Every setting writes to real files in your project. You can version-control them, share them with your team, and edit them directly in the Explorer.